The DeWALT DWE7485 Manual provides essential guidance for users of this powerful table saw, offering insights into its features, operation, and maintenance. This comprehensive manual includes detailed instructions for setup, safety protocols, and troubleshooting tips to ensure effective and safe usage. Whether you're a professional woodworker or a DIY enthusiast, this manual serves as a valuable resource for maximizing the performance and longevity of your DeWALT DWE7485, helping you achieve precise and efficient cuts in all your woodworking projects.# DeWALT
DWE7485 Table Saw Instruction Manual
Definitions: Safety Alert Symbols and Words
This instruction manual uses the following safety alert symbols and words to alert you to hazardous situations and your risk of personal injury or property damage.
- DANGER: Indicates an imminently hazardous situation which, if not avoided, will result in death or serious injury.
- WARNING: Indicates a potentially hazardous situation which, if not avoided, could result in death or serious injury.
- CAUTION: Indicates a potentially hazardous situation which, if not avoided, may result in minor or moderate injury.
(Used without word) Indicates a safety related message.
- NOTICE: Indicates a practice not related to personal injury which, if not avoided, may result in property damage.
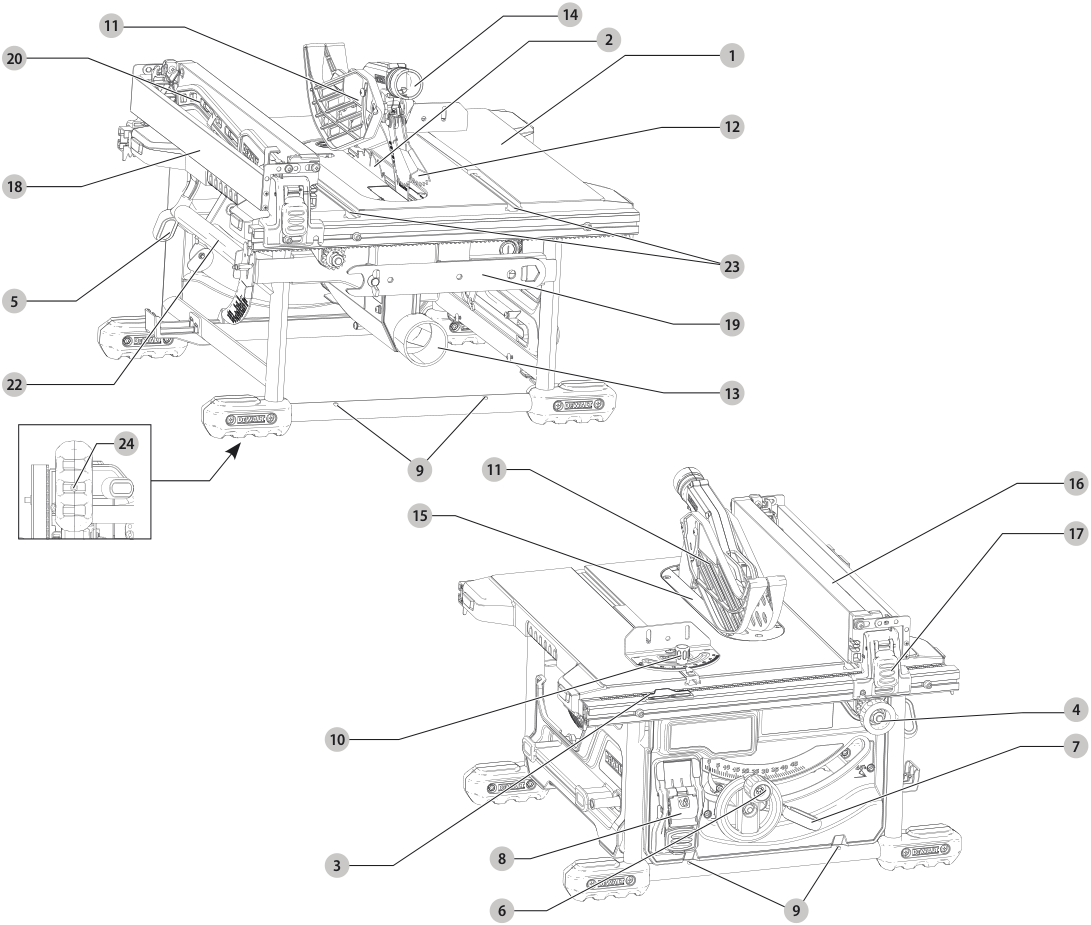
- Table
- Blade
- Rip scale indicator
- Fine adjust knob
- Rail lock lever
- Blade height adjustment wheel
- Bevel lock lever
- ON/OFF switch
- Mounting holes
- Miter gauge
- Blade guard assembly
- Anti-kickback assembly
- Dust collection port
- Guard dust collection port
- Throat plate
- Rip fence
- Rip fence latch
- Narrow ripping fence/support extension
- Blade wrenches (stored position)
- Push stick (stored position) (Fig. E)
- Riving knife (non thru cutting) (Fig. E)
- Carry handle
- Miter gauge track
- Mounting holes (for mounting to DW7440RS brackets)
For questions or comments about this product, call DEWALT toll free at: 1-800-433-9258.
Table Saw
GENERAL POWER TOOL SAFETY WARNINGS
WARNING: Read all safety warnings, instructions, illustrations and specifications provided with this power tool. Failure to follow all instructions listed below may result in electric shock, fire and/or serious injury.
SAVE ALL WARNINGS AND INSTRUCTIONS FOR FUTURE REFERENCE
The term "power tool" in the warnings refers to your mains-operated (corded) power tool or battery-operated (cordless) power tool.
1) Work Area Safety
a) Keep work area clean and well lit. Cluttered or dark areas invite accidents. b) Do not operate power tools in explosive atmospheres, such as in the presence of flammable liquids, gases or dust. Power tools create sparks which may ignite the dust or fumes. c) Keep children and bystanders away while operating a power tool. Distractions can cause you to lose control.
2) Electrical Safety
a) Power tool plugs must match the outlet. Never modify the plug in any way. Do not use any adapter plugs with earthed (grounded) power tools. Unmodified plugs and matching outlets will reduce risk of electric shock. b) Avoid body contact with earthed or grounded surfaces, such as pipes, radiators, ranges and refrigerators. There is an increased risk of electric shock if your body is earthed or grounded. c) Do not expose power tools to rain or wet conditions. Water entering a power tool will increase the risk of electric shock. d) Do not abuse the cord. Never use the cord for carrying, pulling or unplugging the power tool. Keep cord away from heat, oil, sharp edges or moving parts. Damaged or entangled cords increase the risk of electric shock. e) When operating a power tool outdoors, use an extension cord suitable for outdoor use. Use of a cord suitable for outdoor use reduces the risk of electric shock. f) If operating a power tool in a damp location is unavoidable, use a ground fault circuit interrupter (GFCI) protected supply. Use of an GFCI reduces the risk of electric shock.
3) Personal Safety
a) Stay alert, watch what you are doing and use common sense when operating a power tool. Do not use a power tool while you are tired or under the influence of drugs, alcohol or medication. A moment of inattention while operating power tools may result in serious personal injury. b) Use personal protective equipment. Always wear eye protection. Protective equipment such as dust mask, non-skid safety shoes, hard hat, or hearing protection used for appropriate conditions will reduce personal injuries. c) Prevent unintentional starting. Ensure the switch is in the off-position before connecting to power source and/or battery pack, picking up or carrying the tool. Carrying power tools with your finger on the switch or energizing power tools that have the switch on invites accidents. d) Remove any adjusting key or wrench before turning the power tool on. A wrench or a key left attached to a rotating part of the power tool may result in personal injury. e) Do not overreach. Keep proper footing and balance at all times. This enables better control of the power tool in unexpected situations. f) Dress properly. Do not wear loose clothing or jewelry. Keep your hair, clothing and gloves away from moving parts. Loose clothes, jewelry or long hair can be caught in moving parts. g) If devices are provided for the connection of dust extraction and collection facilities, ensure these are connected and properly used. Use of dust collection can reduce dust-related hazards. h) Do not let familiarity gained from frequent use of tools allow you to become complacent and ignore tool safety principles. A careless action can cause severe injury within a fraction of a second.
4) Power Tool Use and Care
a) Do not force the power tool. Use the correct power tool for your application. The correct power tool will do the job better and safer at the rate for which it was designed. b) Do not use the power tool if the switch does not turn it on and off. Any power tool that cannot be controlled with the switch is dangerous and must be repaired. c) Disconnect the plug from the power source and/or the battery pack from the power tool before making any adjustments, changing accessories, or storing power tools. Such preventive safety measures reduce the risk of starting the power tool accidentally. d) Store idle power tools out of the reach of children and do not allow persons unfamiliar with the power tool or these instructions to operate the power tool. Power tools are dangerous in the hands of untrained users. e) Maintain power tools and accessories. Check for misalignment or binding of moving parts, breakage of parts and any other condition that may affect the power tool's operation. If damaged, have the power tool repaired before use. Many accidents are caused by poorly maintained power tools. f) Keep cutting tools sharp and clean. Properly maintained cutting tools with sharp cutting edges are less likely to bind and are easier to control. g) Use the power tool, accessories and tool bits etc. in accordance with these instructions, taking into account the working conditions and the work to be performed. Use of the power tool for operations different from those intended could result in a hazardous situation. h) Keep handles and grasping surfaces dry, clean and free from oil and grease. Slippery handles and grasping surfaces do not allow for safe handling and control of the tool in unexpected situations.
5) Service
a) Have your power tool serviced by a qualified repair person using only identical replacement parts. This will ensure that the safety of the power tool is maintained.
Safety Instructions for Table Saws
1) Guarding Related Warnings
a) Keep guards in place. Guards must be in working order and be properly mounted. A guard that is loose, damaged, or not functioning correctly must be repaired or replaced. b) Always use saw blade guard, riving knife and anti-kickback pawls for every through-cutting operation. For through-cutting operations where the saw blade cuts completely through the thickness of the workpiece, the guard and other safety devices help reduce the risk of injury. c) Immediately reattach the guarding system after completing an operation (such as rabbeting, dadoing or resawing) which requires removal of the guard, riving knife and/or anti-kickback device. The guard, riving knife, and anti-kickback device help to reduce the risk of injury. d) Make sure the saw blade is not contacting the guard, riving knife or the workpiece before the switch is turned on. Inadvertent contact of these items with the saw blade could cause a hazardous condition. e) Adjust the riving knife as described in this instruction manual. Incorrect spacing, positioning and alignment can make the riving knife ineffective in reducing the likelihood of kickback. f) For the riving knife and anti-kickback pawls to work, they must be engaged in the workpiece. The riving knife and anti-kickback pawls are ineffective if they are positioned incorrectly. g) Use the appropriate saw blade for the riving knife. For the riving knife to function properly, the saw blade diameter must match the appropriate riving knife and the body of the saw blade must be thinner than the thickness of the riving knife and the cutting width of the saw blade must be wider than the thickness of the riving knife.
2) Cutting Procedures Warnings
a) DANGER: Never place your fingers or hands in the vicinity or in line with the saw blade. A moment of inattention or a slip could direct your hand towards the saw blade and result in serious personal injury. b) Feed the workpiece into the saw blade or cutter only against the direction of rotation. Feeding the workpiece in the same direction as the saw blade’s rotation above the table may result in the workpiece, and your hand, being pulled into the saw blade. c) Never use the mitre gauge to feed the workpiece when ripping and do not use the rip fence as the length stop when cross cutting with the mitre gauge. Guiding the workpiece at the rip fence and the mitre gauge at the same time increases the likelihood of saw blade binding and kickback. d) When ripping, always apply workpiece feeding force between the fence and the saw blade. Use a push stick when the distance between the fence and the saw blade is less than 150 mm, and use a push block when this distance is less than 50 mm. “Work helping” devices will keep your hand at a safe distance from the saw blade. e) Use only table saw blades that are manufactured for your saw and conform to the requirements for this tool.
Never use a damaged or cut push stick. A damaged push stick may break causing your hand to slip into the saw blade. f) Do not perform any operation “freehand”. Always use either the rip fence or the mitre gauge to position and guide the workpiece. “Freehand” means using your hands to support or guide the workpiece, in lieu of a rip fence or mitre gauge. Freehand sawing leads to misalignment, binding, and kickback. g) Never reach around or over a rotating saw blade. Reaching for a workpiece may lead to accidental contact with the moving saw blade. h) Provide auxiliary workpiece support to the rear and/or sides of the saw table for long and/or wide workpieces to keep them level.
1) Feed workplace at an even pace
i) Do not bend or twist the workplace. If misalignment occurs, turn the tool off immediately, unplug the tool and then clear the jam. Jamming the saw blade by the workplace can cause kickback or stall the motor.
j) Do not remove pieces of cut-off material while the saw is running. The material may become trapped between the fence or inside the saw blade guard and the saw blade pulling your fingers into the saw blade. Turn the saw off and wait until the saw blade stops before removing material.
k) Use an auxiliary fence in contact with the table top when ripping workplaces less than 2 mm. Thick. An inadequate workplace may wedge under the rip fence and create a kickback.
3) Kickback Causes and Related Warnings
Kickback is a sudden reaction of the workplace due to a pinched, jammed saw blade or misaligned fence; it can throw the workplace with respect to the saw blade when a part of the workplace binds between the saw blade and the rip fence or other fixed object.
Most frequently during kickback, the workplace is lifted from the table by the rear portion of the saw blade and is propelled towards the operator.
Kickback is the result of saw misuse and/or incorrect operating procedures or conditions and can be avoided by taking proper precautions as given below.
- Never stand directly in line with the saw blade. Always position your body on the same side of the saw blade as the fence. Kickback may propel the workplace at high velocity towards anyone standing in front and in line with the saw blade.
- Never reach over or in back of the saw blade to pull or to support the workplace.
- Avoid contact with the saw blade may occur if kickback or injury occurs in the rip fence zone.
- Never hold handles or the workplace that is being cut off against the rotating saw blade. Pressing the workplace up against the saw blade will create a binding condition and kickback.
- Align the fence to be parallel with the saw blade. A misaligned fence may cause the workplace against the saw blade and create kickback.
- Use a featherboard to guide the workplace against the table and fence when performing operations that such as rabbeting, dadoing or resawing. A featherboard helps to control the workplace and to prevent a kickback.
- Use extra caution when making a cut into blind areas of assembled workplaces. The protruding saw blade may become hidden in the view of the operator.
- Support large panels to minimize the risk of saw blade pinching and kickback. Large panels tend to sag under their own weight. Support panels to the entire length of the workplace against the table top.
- Use extra caution when cutting a workplace that is twisted, knotted, warped or does not have a straight edge to guide it with a miter gauge or along the fence. A warped, knotted, or twisted workplace is unstable and causes misalignment of the kerf with the saw blade, binding and kickback.
- Never cut more than one workplace, stacked vertically or horizontally. The saw blade could pick up one or more pieces and cause kickback.
- When restraining or letting go the saw blade in the workplace, enter entirely cutting until the kerf so that the saw teeth are not engaged in the material. If the saw blade binds, it may lift up the workplace and cause kickback when the saw is restarted.
- Keep your saw blades clean, sharp, and with sufficient kerf. Never use warped saw blades or saw blades with cracked or broken teeth. Sharp and properly set saw blades minimize binding, stalling and kickback.
4) Table Saw Operating Procedures
- Turn off, remove plug and disconnect power source when removing the table insert, changing the saw blade or making adjustments in the functioning. An anti-kickback pawl or saw blade guard, and when the machine is left unattended. Precautionary measures will avoid accidents.
- Never leave the table saw running unattended. Turn it off and don’t leave the area until it comes to a complete stop. An unattended running saw is an uncontrolled hazard.
- Locate the table saw in a well-lit and level area where you can maintain good footing and balance. It should be installed in an area that provides enough room to easily handle the size of your workplace. Ensure dark, wet and uneven slippery floors to invite accidents.
- Frequently clean and remove sawdust from under the saw table and other dust collecting device. Accumulated sawdust is combustible, and may ignite.
- The table saw must be secured. It table saw is not properly secured you may move it by force.
- Remove tools, wood scraps, etc. from the table before the table saw is turned on. Loose items on top of a table saw can be dangerous.
- Do not use drill bits which cannot be size and shape (diamond versus round) for arbor holes. Saw blades with holes larger than the mandrel or screw of the saw mill can fit, causing loss or damage.
- Never use damaged or incorrect saw blade mounting means such as flanges, saw blade washers, screws, etc. Never use mounting means type specially designed for your saw, for safe operation and optimum performance.
- Never stand on the table saw, do not use it as a stepping stool. Serious injury could occur if the tool is tipped or if the cutting tool is accidentally contacted.
- Make sure that the saw blade is installed to rotate in the proper direction. Do not use grinding wheels, wire brushes, or abrasive wheels on a table saw. Improper saw blade installation will cause excessive heat and may cause serious injury.
Additional Safety Rules for Table Saws
- WARNING : Cutting plastics, copper coated wood, and other materials may cause melted plastic and other slag build up on the blade tips and the body of the saw blade, increasing the risk of saw blade overheating and binding while cutting.
- AVOID AWKWARD POSITIONS , where a sudden slip could cause a hand to move into a saw blade.
- Do not attempt to retrieve materials near the blade on the saw table while the blade is spinning.
- NEVER REACH IN BACK OF, OR AROUND, THE CUTTING TOOL with either hand to hold down the workplace.
- KEEP ARMS, HANDS AND FINGERS AWAY from the blade to prevent serious injury.
- USE A PUSH STICK THAT IS APPROPRIATE FOR THE APPLICATION TO PUSH WORKPIECES THROUGH THE SAW . A push stick is a wooden or plastic stick, often homemade, that should be used whenever the size or shape of the workplace would cause you to place your hands within (152 mm) of the blade.
- USE HOLD-DOWNS, JIGS, FIXTURES OR FEATHER BOARDS TO HELP GUIDE AND CONTROL THE WORKPIECE . Accessories for use with your tool are available at extra cost from your local dealer or participating service center. Instructions may accompany the optional accessory. A push block and feather boards are included in this manual.
- DO NOT PERFORM RIPPING, CROSSCUTTING OR ANY OTHER OPERATION FREEHAND . Never reach around or over saw blade while the blade is spinning.
- STABILITY : Make sure the table saw is firmly mounted to a secure surface before use to avoid movement.
- THE TABLE SAW SHOULD ONLY BE SET UP ON A LEVEL AND STABLE SURFACE . The work area should be free from obstructions and trip hazards. No materials or tools should be leaned against it.
- CERTAIN METALS, CEMENT BOARD OR MASONRY: Certain man-made materials have properties that may damage saw blades. Check with the manufacturer's recommendations for these items. Damage to cutting and personal injury may result.
- Disconnect from station and/or move dust projector out the table saw as a saw vent that may be required when moving bulk openings.
- KEEP THE MITER GAUGE AND FENCE LOCK IN PLACE AT ALL TIMES to reduce the risk of unexpected movement and possible injury.
- ALWAYS USE CLEAN, SHARP SAW BLADES.
- WEAR GLOVES WHEN HANDLING SAW BLADES.
- PRESS THE COVER SAW BLIND FOR THE BENDED OPERATION : The blade must rotate in the direction of the arrows. Shiny round the blade obey gripping press and not expect of stable blade for a missing operation. Do not use a damaged or dull saw blade.
- NEVER ATTEMPT TO FREE A STALLED BLADE WITHOUT FIRST TURNING THE MACHINE OFF AND DISCONNECT THE PLUG FROM THE POWER SOURCE . Wait for the saw head on/off three becomes trapped inside the blade guard assembly, turn saw off and wait for the next store blade binding the blade and assembly and removing the blade.
- NEVER START THE MACHINE WITH THE WORKPIECE AGAINST THE BLADE to reduce the risk of motor overheat and personal injury.
- NEVER MAKE ADJUSTMENTS TO THE UNIT WITH THE BLADE . Personal injury may occur. Stand to the side of the saw blade.
- DO NOT REMOVE LAYOUT, ASSEMBLY OR SET-UP WORK on the table/work area when the mechanism is running. A sudden slip could cause a hand to move into the blade. Severe injury may result.
- NEVER PERFORM ANY ADJUSTMENTS WHILE THE SAW IS RUNNING such as fence positioning or removal, bevel lock adjustment, or blade height adjustment.
- CLEAN THE TABLE/WORK AREA BEFORE LEAVING THE MACHINE . Lock the switch in the "OFF" position and disconnect the plug from the power source to prevent unauthorized use.
- ALWAYS lock the fence and bevel adjustment before cutting .
- AVOID OVERHEATING THE SAW BLADE TIPS . Keep metal moving and parallel with the fence. Do not force work into the blade.
- IF CUTTING PLASTIC MATERIALS, AVOID MELTING THE PLASTIC.
- Periodically twist the band or the workplace unsuspected to the spring of the board as to secure it flat to the table resulting in loss of control and possible injury . Provide proper support for the workplace, based on its size and the type of operation to be performed. Use the right size, weight, and material for the task. Use appropriate breaking materials.
- IF THIS SAWMILL should malfunction or if it vibrates excessively, cease operating immediately, turn off and disconnect the plug from the power source until the problem has been located and corrected. Failure to act shall/could cause severe center. Authorized service center or other qualified service personnel if the problem can not be found.
- DO NOT OPERATE THIS MACHINE if it isn't completely assembled and installed according to its instructions. A machine incorrectly assembled can cause serious injury.
- NEVER attempt to cut a stock/fence please of materials which could cause loss of control or kickback. Support all materials securely.
- NEVER USE FOR TAPERED CUTTING.
Saw Blades
- Do not use saw blades that do not conform to the dimensions stated in the Specifications.
- Do not use any spacers to make a blade fit onto the spindle. Use only the blades specified in this manual, complying with EN847-1, if intended for wood and similar materials.
- Consider applying specially designed noise-reduction blades.
- Do not use high steel (HS) saw blades.
- Do not use cracked or damaged saw blades.
- Ensure that the chosen saw blade is suitable for the material to be cut.
- Always wear gloves when handling saw blades and rough material. Saw blades should be carried in a holder wherever practicable.
Additional Safety Information
- ANSI Z87.1 eye protection (CAN/CSA Z94.3),
- ANSI S12.6 (S3.19) hearing protection,
- NIOSH/OSHA/MSHA respiratory protection.
Your risk from these exposures varies, depending on how often you do this type of work. To reduce your exposure to these chemicals: work in a well-ventilated area, and work with approved safety equipment, such as those dust masks that are specially designed to filter out microscopic particles.
- Avoid prolonged contact with dust from power sanding, sawing, grinding, drilling, and other construction activities. Wear protective clothing and wash exposed areas with soap and water. Allowing dust to get into your mouth, eyes, or lay on the skin may promote absorption of harmful chemicals.
- Use a dust extraction system or other dust collection device to reduce exposure.
- Use a NIOSH/OSHA/MSHA approved respiratory mask or face mask.
Specifications
- Table Size: 19 X 19" (485 x 485 mm)
- Miter Angle: 30° left and right
- Bevel Angle: 0° to 47° left
- Blade Size: 8-1/4" (210 mm)
- Max. Cut Depth, 0° Bevel: 2-9/16" (65 mm)
- Max. Cut Depth, 45° Bevel: 1-3/4" (45 mm)
- RPM, no load: 5800
Unpacking (Fig. B)
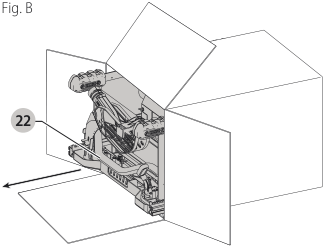
Carefully unpack the table saw and all loose items from the carton. Examine all parts to make sure that parts have not been damaged during shipping. If any parts are missing or damaged, contact your dealer to replace them before attempting to assemble the tool.
COMPONENTS (FIG. A)
Refer to Figure A at the beginning of this manual for a complete list of components.
Assembly (FIG. A)
Assembly Order (Fig. A)
- Unlock and remove the throat plate
15. Refer to Removing the Throat Plate section . - Make sure blade is installed correctly and arbor nut is tight. Use wrenches
19stored on the tool. Refer to Figure A. - Position the blade guard assembly
11. - Attach anti-kickback assembly
12to the guard assembly. - Install and lock throat plate
15. NOTE: Adjust leveling screws before proceeding. Refer to Installing the Throat Plate . - Attach the rip fence
16. NOTE: Adjust rip scale before proceeding. Refer to Adjusting the Rip Scale .
Cable Gauges
Installing the Throat Plate (Fig. C)
- Align the throat plate as shown in Figure C, and insert the tabs on the back of the throat plate into the holes on the back of the table opening.
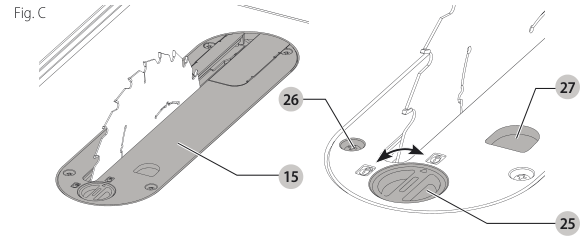
figure C showing the placement - Rotate cam counterclockwise until the front of throat plate drops into place. Secure by rotating cam lock knob 1/4 turn (when cam lock is under the table holding the throat plate in place).
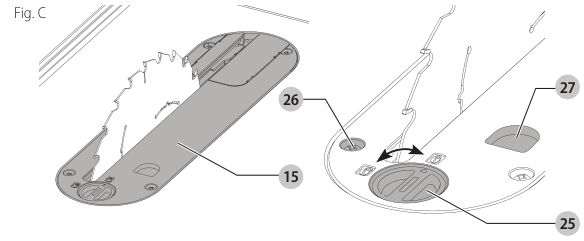
close-up on cam lock - The throat plate includes four adjustment screws which raise or lower the throat plate. When properly adjusted, the front of the throat plate should be flush or slightly below the surface of the top and secured in place. The rear of the throat plate should be flush or slightly above the table top.
Removing the Throat Plate
- Remove the throat plate by turning the cam lock knob 1/4 turn counterclockwise.
- Using finger hole on the plate, pull throat plate up and forward to expose the inside of the saw. DO NOT operate the saw without the throat plate.
Installing/Replacing the Blade (Fig. A, C, D)
CAUTION: Always wear gloves for handling saw blades or rough material. Saw blades should be carried in a holder whenever practicable.
- Raise the saw blade arbor to its maximum height by turning the blade height adjustment wheel clockwise.
- Remove the throat plate.
- Remove the arbor nut and clamp washer from the saw arbor by turning counterclockwise.
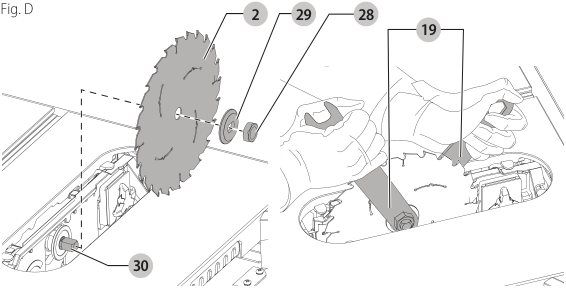
detailed view of components - Place the new blade on to the arbor making sure the teeth of the blade point down at the front of the table. Assemble the clamp washer and arbor nut to the arbor and tighten arbor nut as far as possible by hand, making sure that the saw blade is against the inner flange and the clamp washer is against the blade. Ensure the largest diameter of the clamp washer is against the blade. Ensure the arbor and clamp washer are free from dust and debris.
- Use the open end of the wrench to keep the arbor from rotating when tightening the arbor nut.
- Using the other wrench, tighten the arbor nut by turning it clockwise.
- Place and tighten the table insert.
- Install and lock the throat plate.
Installing/Removing the Blade Guard Assembly and Riving Knife (Fig. E)
WARNING: Use blade guard assembly for all through-cutting.
NOTE: The saw is shipped with the non-through-cutting riving knife installed.
- Raise the saw blade arbor to its maximum height.
- Loosen the riving knife lock knob (minimum of three turns).
- To disengage riving knife lock pin, push lock knob toward the riving knife as indicated by the yellow arrows on the knob.
- While pushing the lock knob, lift the riving knife out of the clamp. Then slide the blade guard assembly into the clamp until it bottoms out.
- WARNING: Do not insert both blade guard assembly and riving knife into the clamp at the same time.
- Release the lock knob to engage the lock pin. Give the blade guard a slight pull upwards to ensure pin is engaged.
- Tighten the riving knife lock knob.
- Reinstall the throat plate.
- To remove the bladed guard assembly, follow these steps in reverse order.
Assembling the Rip Fence (Fig. F)
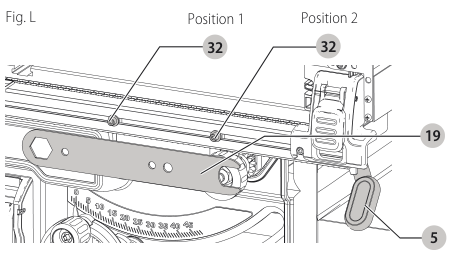
The fence can be installed in two positions on the right (position 1 for 0” to 20” (508 mm) ripping, and position 2 for 4” (102 mm) to 24.5” (622 mm) ripping) and one position on the left of the table saw.
- Align the locator pins on the fence rails with the slots on each fence end.
- Place fence onto the rail as shown in Figure F maintaining pin and slot alignment on both ends of the fence.
- Secure the rip fence by snapping down the latches to the rails. Be sure to snap both front and rear latches in place.
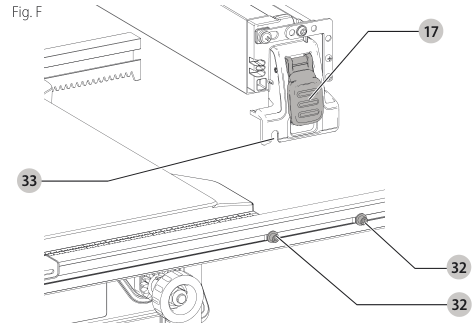
Table saw diagram with parts labeled
Adjusting the Rip Scale (Fig. G)
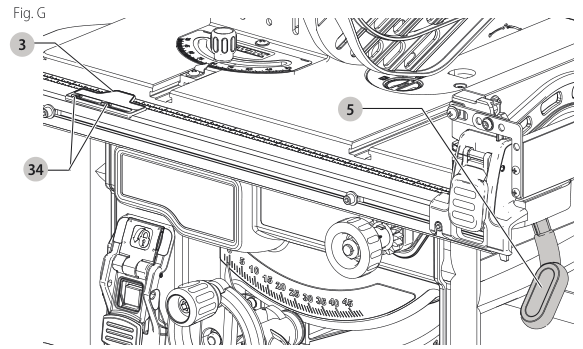
- Unlock the rail lock lever.
- Set the blade at 0°, level and move the fence in until it touches the blade.
- Lock the rail lock lever.
- Loosen the rip scale indicator screws and set the rip scale indicator to read zero (0).
- Re-tighten the rip scale indicator screws. The yellow rip scale (top) reads correctly only when the fence is mounted on the right side of the blade and is in position 1 (for 0 to 20" (508 mm) ripping) out to 24.5" (622 mm) rip position . The white scale (bottom) reads correctly only when the fence is mounted on the right side of the blade and in position 2 (for 4" (102 mm) to 24.5" (622 mm) ripping)].
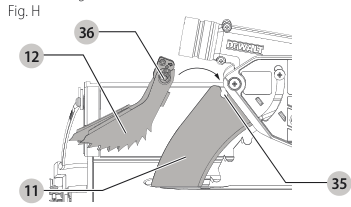
Anti-Kickback Assembly (Fig. H)
⚠️ WARNING: To reduce the risk of serious personal injury, the anti-kickback assembly must be in place for all possible cuts.
- Remove the anti-kickback assembly from the storage position by depressing the stem.
- Refer to Storage.
- Locate the anti-kickback mounting slot at the top rear of the blade guard assembly.
- Align the stem with the mounting slot. Depress the stem and push down on the anti-kickback assembly until it snaps and locks into place.
- To remove the anti-kickback assembly, depress the stem and pull up and out of the mounting slot.
With power disconnected, operate the blade tilt and height adjustments through the extremes of travel and ensure the blade guard assembly clears the blade in all operations and that the anti-kickback assembly is functioning.
Bench Mounting (Fig. A)
NOTE: A portable table saw stand is designed for use with this saw and is available at a local DEWALT dealer or service center at extra cost.
ASSEMBLY AND ADJUSTMENTS
⚠️ WARNING: To reduce the risk of serious personal injury, turn unit off and disconnect it from power source before making any adjustments or removing/installing attachments or accessories. An accidental start-up can cause injury.
NOTE: This saw is fully and accurately adjusted at the factory at the time of manufacture. If readjustment due to shipping and handling or any other reason is required, follow the sections below to adjust the saw. Once made, these adjustments should remain accurate. Take a little time now to follow these directions carefully and recheck the accuracy with this saw's capable.
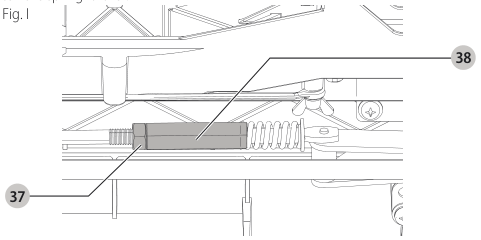
Rail Lock Adjustment (Fig. C)
(Tightening Fence Clamping System)
- Lock the rail lock lever.
- On the underside of the saw, loosen the jam nut.
- Tighten the hex rod until the spring on the locking system is more compressed, (not fully compressed) creating the desired tension on the rail lock lever. Retighten the jam nut against the hex rod.
- Check that the fence does not move when the lock lever is engaged.
Rip Scale Adjustment
See Adjusting the Rip Scale under Assembly.
Adjusting Blade Alignment (Fig. A, J)
(Blade Parallel to Miter Slot)
⚠️ WARNING: Cut Hazard. Check the blade at 0° and 45° to make sure blade does not hit the throat plate, causing personal injury.
If the blade appears to be out of alignment with the miter slot on the table top, it will require calibration for alignment. To realign the blade and miter slot, use the following procedure:
⚠️ WARNING: To reduce the risk of serious personal injury, turn unit off and disconnect it from power source before making any adjustments or removing/installing attachments or accessories. An accidental start-up can cause injury.

- Using a 5 mm hex wrench, loosen rear pivot bracket fasteners just enough to allow the bracket to move side-to-side.
rear pivot bracket fasteners - Adjust the bracket until the blade is parallel to the miter gauge track .
miter gauge track - Tighten the rear pivot bracket fasteners to 110–120 in-lbs (12.5–13.6 Nm).
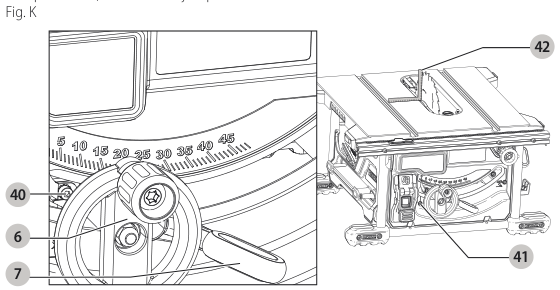
Bevel Stop and Pointer Adjustment (Fig. K)
- Raise the blade fully by rotating the blade height adjustment wheel clockwise until it stops.
blade height adjustment - Unlock the bevel lock lever by pushing it up and to the right. Loosen the bevel stop screw
bevel lock lever .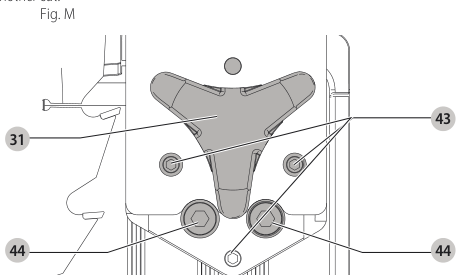
bevel stop screw - Place a square flat against the table top and against the blade between teeth, as shown in Figure M. Ensure the bevel lock lever is in its unlocked, or up, position.
square placement - Using the bevel lock lever, adjust the bevel angle until it is flat against the square.
- Tighten the bevel lock lever by pushing it down.
- Turn the bevel stop screw 40 to rotate the cam until it firmly contacts the bearing block. Tighten the bevel stop screw
bevel stop screw adjustment .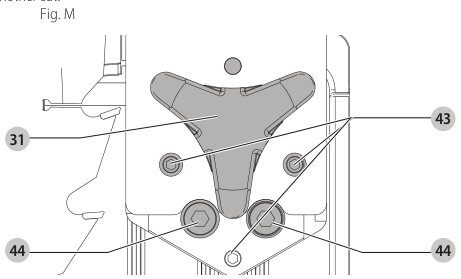
tighten screw - Check the bevel angle scale. If the pointer does not read 0°, loosen pointer screw 41 and move the pointer so it reads correctly. Re-tighten the pointer screw.
loosen screw - Repeat step 4-5, but do not adjust pointer.
Fence Alignment Adjustment (Fig. F, L)
(Blade Parallel to Fence)
If you experience fence alignment problems and want to correct an out of parallel alignment between the fence and the blade, be sure to check the alignment of the blade to the miter slot first. After confirming that both elements are aligned, proceed with alignment of the blade to the fence using the following procedure:
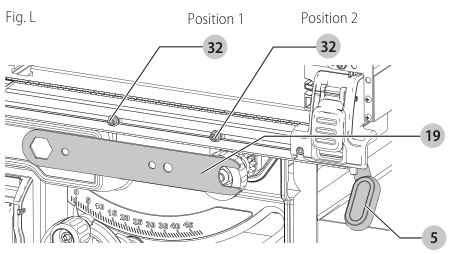
Position 1 Fence Alignment
- Install the fence in position 1 (Refer to Figure F) and unlock the rail lock lever . Locate both locator pins
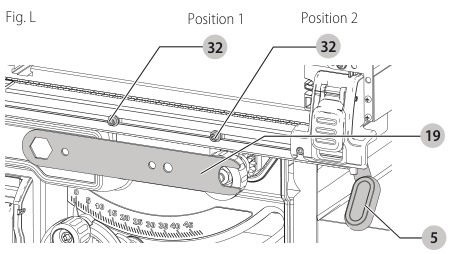
rail lock lever 32 that support the fence on the front and rear rails.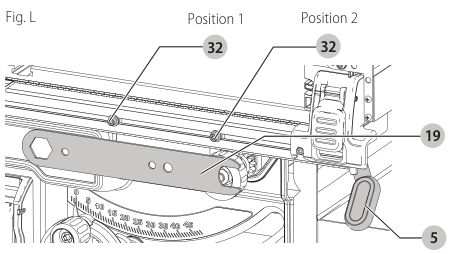
locator pins - Loosen the rear locator pin screw and adjust the alignment of the fence in the groove until the fence face is parallel to the blade. Make sure you measure from the fence face to the front and back of the blade to ensure alignment.
- Tighten the rear locator pin screw.
- Check rip scale pointer adjustment. NOTE: Follow the Position 1 Fence Alignment instructions for aligning the fence on the left of the blade.
Position 2 Fence Alignment
- To align position 2 fence locator pins, ensure position 1 pins have been aligned, refer to Position 1 Fence Alignment.
- Loosen the position 2 locator pins, then using holes in the blade wrench 19 as a guide for positioning, align the pins (Fig. L).
blade wrench - Tighten the locator pins (front and rear).
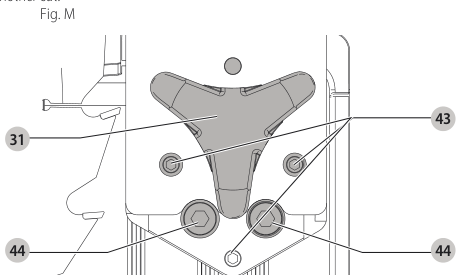
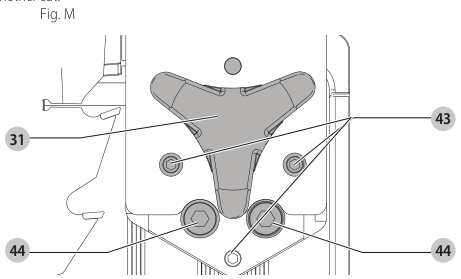
Aligning Riving Knife to Blade (Fig. M)
- Remove the throat plate. Refer to Removing the Throat Plate under Assembly .
- Raise the blade to full depth of cut and 0° bevel angle.
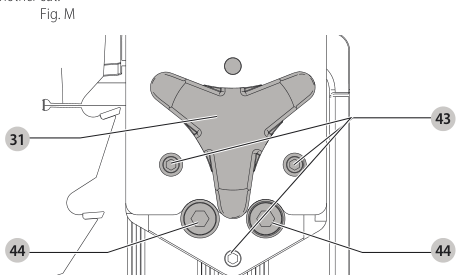
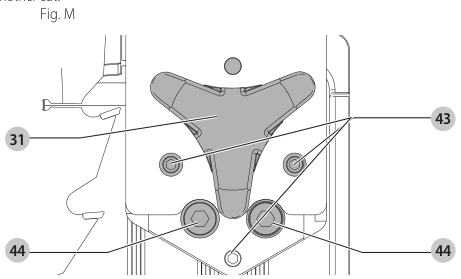
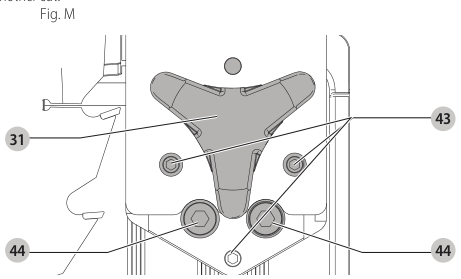
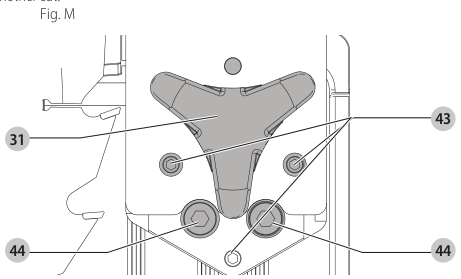
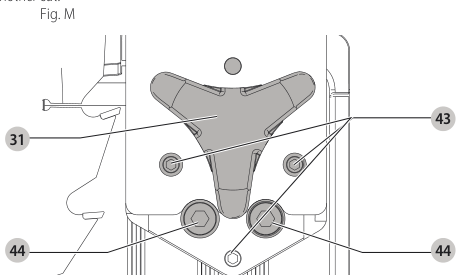
- Locate the three small set screws adjacent to the riving knife lock knob 38. These screws will be used to adjust the riving knife position.
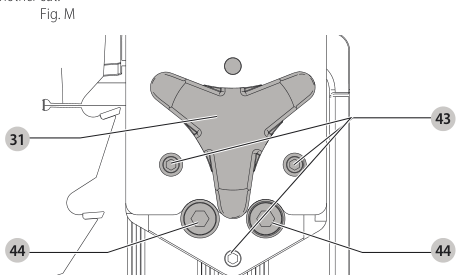
set screws - Lay a straight edge on the table against two blade tips. The riving knife should not touch the straight edge.
- Loosen the two larger lock screws 44.
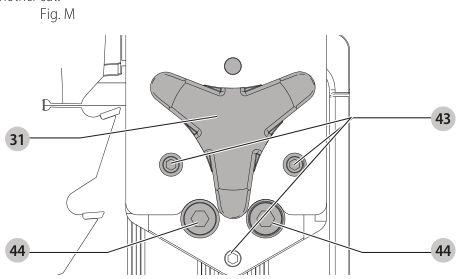
lock screws - Use the small set screws 43 to adjust the riving knife position. Lay the straight edge on the opposite side of the blade and repeat adjustments as needed.
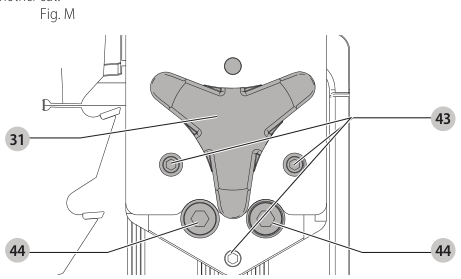
set screw adjustment - Lightly tighten the two larger lock screws 44.
tighten lock screws - Place a square flat against the riving knife to verify the riving knife is vertical and in-line with the blade.
- If needed, use the set screws to bring the riving knife vertical with the square.

set screws - Repeat step 9 for the verify position of riving knife. Repeat 9 through 11 if necessary.
- Fully tighten the two larger lock screws 44.

tighten lock screws
Saw Blades
WARNING: Before connecting the table saw to the power source or operating the saw, always inspect the guard assembly and riving knife for proper alignment and clearance with saw blade. Check alignment after each change of bevel angle. If any dragging or binding of the material is encountered as it reaches the riving knife, turn off and disconnect machine from power source. Ensure proper riving knife alignment before attempting another cut.
Splitter and Riving Knife Selection (Fig. N)
WARNING: To minimize the risk of kickback and to ensure proper cutting, the splitter and riving knife must be the proper thickness for the blade used.
The splitter and riving knife supplied with this table saw is correct for the blade supplied with the saw. If a different blade is used, check the blade body (plate) thickness and the blade kerf (cutting) width marked on the blade or on the blade packaging. The splitter and riving knife thickness must be greater than the body thickness and less than the kerf width as shown in Figure N.
The riving knife provided with this saw is marked as follows: 0.087" (2.2 mm) THICK KNIFE, ONLY USE WITH 8-1/4" (210 mm) BLADE WITH .094" (2.4 mm) MIN KERF WIDTH AND .079" (2.0 mm) MAX BODY THICKNESS. Blade body, blade body and kerf width dimensions for all DWE7485 table saw blades are available at www.dewalt.com.
A different blade is used and the body thickness and kerf width dimensions are not provided, use the following procedure to determine the correct riving knife thickness:
- Measure the body thickness of the blade.
- Make a shallow cut in scrap material and measure the kerf width.
- Select the riving knife.
- Slide the riving knife through the shallow cut made in step 2 to confirm the correct riving knife has been selected. The riving knife should not bind or drag through the cut.
WARNING: If any dragging or binding of the material is encountered as it reaches the riving knife, turn off unit and disconnect machine from power source. Repeat steps 1–4 to make the proper riving knife selection before attempting another cut.
Kickback
Kickback is a dangerous condition that is caused by the workpiece binding against the blade. The result is that the workpiece can move rapidly in a direction opposite to the feed direction. During kickback, the workpiece could be thrown back at the operator. It can also drag the operator's hand back into the blade if the operator's hand is at the rear of the blade. If kickback occurs, turn the saw OFF and verify the proper functioning of the riving knife unit, anti-kickback assembly and blade guard assembly before resuming work.
WARNING: See Safety Instructions for Table Saws and follow all warnings provided regarding KICKBACK.
OPERATION
WARNING: Before using the saw, verify the following each and every time:
- ALWAYS wear proper eye, hearing and respiratory equipment.
- Blade is securely tightened.
- Bevel angle and rail lock levers are locked.
- If ripping, ensure the correct riving knife lever is locked and that the fence is parallel to the blade.
- If crosscutting, miter gauge knob is securely tightened.
- The blade guard assembly is properly attached and the anti-kickback assembly is functioning.
- ALWAYS inspect the blade guard assembly and riving knife for proper alignment, operation, and clearance with saw blade.
- ALWAYS make sure both guards are in the down position in contact with the table before operating.
Failure to adhere to these common safety rules can greatly increase the likelihood of injury.
There are two basic types of cutting with table saws: ripping and crosscutting. Regardless of material, man or material width, the distinction between ripping and crosscutting is as follows: ripping is cutting lengthwise (with usually with the grain) and crosscutting describes cutting material across the shorter dimension (usually against the grain).
WARNING: When ripping, always use the fence to provide a guide for the material and blade guard assembly to protect against a kickback situation. WARNING: Disconnect power from saw during operation freehand. Never perform plunge cutting.
WARNING: When crosscutting, always use the miter gauge. Do not use both the rip fence and miter gauge together.
ON/OFF Switch (Fig. 0)
WARNING: To reduce the risk of injury, be sure that switch is in the OFF position before plugging machine in.
Push green button in to turn this saw on and push down the red paddle to turn this saw off.
Lock Off Feature Instructions
A cover above the switch folds down for insertion of a padlock to lock the saw off. A padlock with a maximum diameter of 1/4" (6.35 mm) and minimum clearance of 3" (76.2 mm) is recommended.
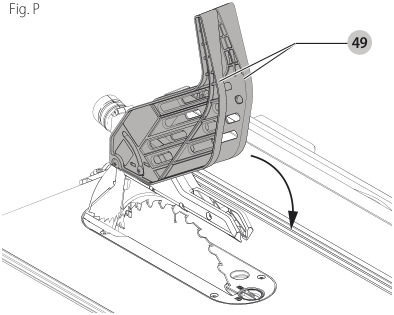
Guard Operating Feature (Fig. P)
WARNING: To reduce the risk of serious personal injury, turn unit off and disconnect it from power source before making any adjustments or removing/installing attachments or accessories. An accidental start-up can cause injury.
- The guard arms will lock in place when in the raised position.

49 - The feature improves visibility when measuring the blade to fence distance.
- Push down on guard(s) and they will release to the operating position.
NOTE: Pull on the anti-kickback assembly to ensure it is locked in place. ALWAYS make sure both guards are in the down position in contact with the table before operating.
Rip Fence Operation (Fig. A, Q)
Rail Lock Lever (Fig. A)
The rail lock lever

WARNING: When ripping, always lock the rail lock lever.

Work Support Extension/Narrow Ripping Fence (Fig. A, Q)
The table saw is equipped with a narrow ripping fence


Fine Adjustment Knob (Fig. A)
The fine adjustment knob allows smaller adjustments when setting the fence. Before adjusting, be sure the rail lock lever is in the up or unlocked position.
Rip Scale Pointer
The rip scale pointer will need to be adjusted for proper performance of the rip fence if the user switches between thick and thin kerf blades. The rip scale pointer only reads correctly for position 1 to 12 (0" to 24" 610 mm ), however for position 1 with narrow rip fence in use add 2" (51 mm). See Adjusting the Rip Scale under Assembly.
Through-Cutting Operations
WARNING: Use blade guard assembly for all through-cutting operations.
Ripping (Fig. R)
- WARNING: Never cut the "free end" of the workpiece or a "free piece" that is cut off, while the power is ON and/or the saw blade is rotating. Piece may contact the blade resulting in a thrown workpiece and possible injury.
- WARNING: A rip fence should ALWAYS be used for ripping operations to prevent loss of control and personal injury. NEVER perform a ripping operation freehand. ALWAYS lock the fence to the rail.
- WARNING: When bevel ripping and whenever possible, place the fence on the side of the blade so that the blade is tilted away from the fence and hands.
- WARNING: Keep hands clear of the blade.
- WARNING: Use a push stick to feed the workpiece if there are 2–6" (51–152 mm) between the fence and the blade. Use a narrow ripping fence and push block to feed the workpiece if there are 2" (51 mm) or narrower between the fence and the blade.
- Lock the rip fence by pressing the rail lock lever down. Remove the miter gauge.
- Raise the blade so it is about 1/8" (3.2 mm) higher than the top of the workpiece.
- Hold the workpiece flat on the table and against the fence. Keep the workpiece about 1" (25.4 mm) away from the blade.
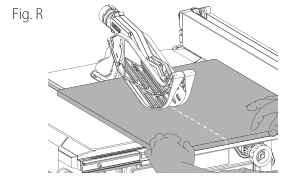
- WARNING: The workpiece must have a straight edge against the fence and not be warped, twisted, or bowed. Keep both hands away from the blade and away from the path of the blade. See proper hand position in Figure R.
- Turn the saw on and allow the blade to come up to speed. Both hands can be used in starting the cut. When there are approximately 12" (305 mm) left to be ripped, use only one hand, with your thumb pushing the material, your index and second fingers holding the material down and your other fingers hooked over the fence. Always keep your thumb along with your first two fingers and pointed away.
- Keeping the workpiece against the blade and the fence, slowly push the material forward all the way through the saw blade. Continue pushing the workpiece until it is clear of the blade guard assembly and it falls off the rear of the table. Do not overload the motor.
- Never try to pull the workpiece back with the blade turning. Turn the switch off, allow the blade to stop, raise the anti-kickback paws on each side of the riving knife if necessary and slide the workpiece out.
- When using a long piece of material or a panel, always use a work support. A sawhorse, rollers, or out-feed assembly provides adequate support for this purpose. The work support must be at the same height or slightly lower than the saw table.
- WARNING: Never push or hold onto the free or cut-off side of the workpiece if it is between the blade and the fence.
Ripping Small Pieces (Fig. A)
It is unsafe to rip small pieces. It is not safe to put your hands closer to the blade. Instead, rip a larger piece to obtain the desired piece. When a small width is to be ripped and the hand cannot be safely put between the blade and the rip fence, use one or more push sticks. A pattern is included at the end of this manual to make push sticks. A push stick 28 is included with this saw, attached to the rip fence. Use the push stick(s) to hold the workpiece against the table and fence, and push the workpiece fully past the blade. The narrow ripping feature on the table saw may be used for some narrow rip cuts. You may also use an auxiliary narrow ripping fence. Instructions for making an auxiliary fence are provided in the back of the manual.
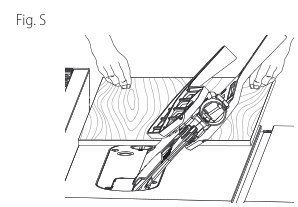
Bevel Ripping (Fig. S)
This operation is the same as ripping except the bevel angle is set to an angle other than zero degrees. For proper hand position, refer to Figure R.
- WARNING: Before connecting the table saw to the power source or operating the saw, always inspect the guard assembly and riving knife for proper alignment and clearance with saw blade. Check alignment after each change of bevel angle. If any dragging or binding of the material is encountered as it reaches the riving knife, turn unit off and disconnect machine from power source. Ensure proper riving knife alignment before attempting another cut.
Crosscutting (Fig. T)
- WARNING: NEVER use rip fence in combination with miter gauge.
- WARNING: NEVER touch the "free end" of the workpiece or a "free piece" that is cut off, while the power is ON and/or the saw blade is rotating. Piece may contact the blade resulting in a thrown workpiece and possible injury.
- **WARNING: **To reduce the risk of injury, NEVER use the fence as a guide or length stop when crosscutting.
- WARNING: NEVER use a length stop on the free end of the workpiece when crosscutting. In short, the cut-off piece in any through-cutting (cutting completely through the workpiece) operation must never be confined — It must not be allowed to move away from saw blade to prevent contact with blade resulting in thrown workpiece and possibly injury.
- WARNING: Use caution when starting the cut to prevent binding of the blade; assembly against the workpiece resulting in damage to saw and possible injury.
- WARNING: When using a block as a cut-off gauge, the block must be at least 3/4" (19 mm) thick and is very important that the rear end of the block be positioned so the workpiece is clear of the block before it enters the blade contact with blade resulting in a thrown workpiece and possibly injury.
- Remove the rip fence and place the miter gauge in the desired slot.
- Adjust the blade height so that the blade is about 1/8" (3.2 mm) higher than the top of the workpiece.
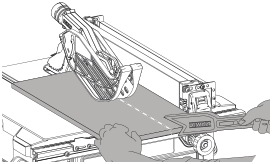
- Hold the workpiece firmly against the miter gauge with the path of the blade in line with the desired cut location. Keep the workpiece an inch or so in front of the blade. KEEP BOTH HANDS AWAY FROM THE BLADE AND THE PATH OF THE BLADE. Start the saw motor and allow the blade to come up to speed.
- While using both hands to keep the workpiece against the face of the miter gauge, and holding the workpiece flat against the table, slowly push the workpiece through the blade.
- Stop the workpiece when it is completely past the blade turning. Turn the switch off, allow the blade to stop, and carefully slide the workpiece out.
- WARNING: Never touch or hold onto the free or cut-off end of the workpiece.
Bevel Crosscutting
This operation is the same as crosscutting except that the bevel angle is set to an angle other than 0°
- WARNING: Before connecting the table saw to the power source or operating the saw, always inspect the guard assembly and riving knife for proper alignment and clearance with saw blade. Check alignment after each change of bevel angle. If any dragging or binding of the material is encountered as it reaches the riving knife, turn off unit and disconnect machine from power source. Ensure proper riving knife alignment before attempting another cut.
Mitering (Fig. T)
- WARNING: Miter angles greater than 45˚ may force the blade guard assembly into the saw blade causing damage to the blade guard assembly and personal injury. Before starting the motor, test the operation by feeding the workpiece into the blade guard assembly. If the blade guard assembly contacts the blade, raise the workpiece under the blade guard assembly, not touching the blade, before starting the motor.
- WARNING: Certain workpiece shapes, such as molding may not lift the blade guard assembly properly. Feed the workpiece slowly past the saw and out of the blade guard assembly. The blade covers the blade, place the workpiece under the blade guard assembly, not touching the blade, before starting the motor.
Miter operation is the same as crosscutting except the miter gauge is locked at an angle other than 0°. Hold the workpiece FIRMLY against the miter gauge 10 and feed the workpiece slowly into the blade to prevent the workpiece from moving.
Miter Gauge Operation
- To set your miter gauge:
- Loosen the miter gauge lock knob.
- Move the miter gauge to the desired angle.
- Tighten the miter gauge lock knob.
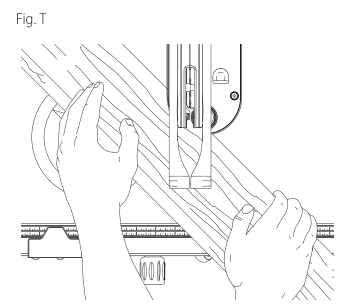
Diagram of saw blade and wood positioning
Compound Mitering
This is a combination of bevel crosscutting and mitering. Follow the instructions for both bevel crosscutting and mitering.
Non-Through-Cutting (Grooving and Rabbetting)
Instructions in the Ripping, Crosscutting, Bevel Crosscutting, Mitering, and Compound Mitering sections are for cuts made through the full thickness of the material. The saw can also perform non-through cuts to form grooves or rabbets in the material.
Non-Through-Ripping (Fig. U, E)
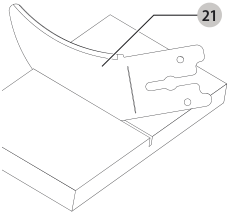
- WARNING: Remove the blade guard assembly and install the non-through-cutting riving knife 21 for non-through-cutting operations. Use featherboards for all non-through-cutting operations where the blade guard assembly, anti-kickback assembly and riving knife cannot be used.
- WARNING: A rip fence should ALWAYS be used for ripping operations to prevent loss of control and personal injury. NEVER perform a ripping operation freehand. ALWAYS lock the fence to the rail.
- WARNING: When bevel ripping and whenever possible, place the fence on the side of the blade so that the blade is tilted away from the fence and hands.
- Remove the blade guard assembly 18 and install the non-through-cutting riving knife 21.
- Lock the rip fence by pressing the rail lock lever down. Remove the miter gauge.
- Raise the blade to the desired cut depth.
Non-Through-Ripping Small Pieces (Fig. A)
- If a small width is to be ripped and the hand cannot be safely put between the blade and rip fence, use a push stick. A push stick 20 is included with this saw, attached to the rip fence. Attach the push stick(s) to hold the workpiece against the table and fence, and push the workpiece fully past the blade.
Non-Through-Bevel Ripping (Fig. V)
This operation is the same as non-through-rip cutting except the bevel angle is set to an angle other than zero degrees.
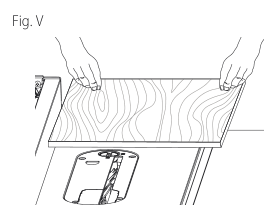
Non-Through-Crosscutting (Fig. W)
- WARNING: NEVER use rip fence in combination with miter gauge.
- WARNING: To reduce the risk of injury, NEVER use the fence as a guide or length stop when crosscutting.
Non-Through-Bevel Crosscutting
This operation is the same as crosscutting except that the bevel angle is set to an angle other than 0°.
Non-Through-Miter Gauge Operation
- Loosen the miter gauge lock knob 32.
- Move the miter gauge to the desired angle.
- Tighten the miter gauge lock knob.
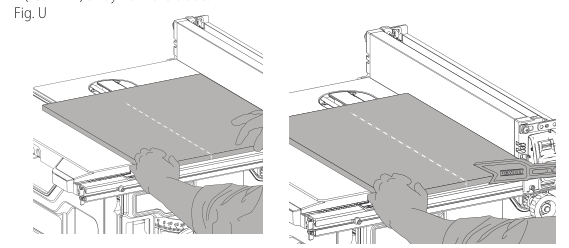
- WARNING: The workpiece must have a straight edge against the fence and must not be warped, twisted or bowed. Keep both hands away from the blade and away from the path of the blade. See proper hand position 8.
- Turn the saw on and allow the blade to come up to speed. Both hands can be used in starting the cut. When there are approximately 1/2˝ (305 mm) left to be ripped, use only one hand, with your thumb pushing the material forward and your second finger holding the material down and your other fingers hooked over the front edge.
- Never try to free the workpiece while the blade is turning. Turn the switch off, allow the blade to stop and slide the workpiece out.
- When using a rip fence only, always use a work support.
Non-Through-Compound Mitering
This is a combination of non-through-bevel crosscutting and non-through-mitering. Follow the instructions for both non-through-bevel crosscutting and non-through-mitering.
Dust Collection (Fig. A)
This table saw is equipped with a guard dust collection port
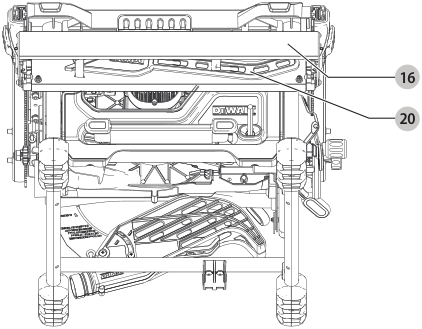
NOTICE: Care should be taken to position hoses to not interfere with cutting operation.
WARNING: To prevent accidental start up, disconnect it from power source before cleaning or dust collection system.
- Turn the saw on its side, so the bottom, open part of the unit is accessible.
- Open the dust access door by removing 2 screws and detaching the door.
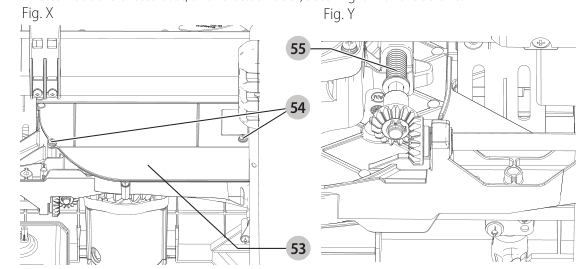
Dust access door - Clean out the access dust and re-attach door, securing it with the screws.
Motor Overload and Power Loss Reset Switch
If power is interrupted by a circuit breaker trip, or power is lost, the saw contains a power loss reset switch that will automatically reset to OFF position. Circuit breaker overloads are often the result of a dull blade. Change your blade on a regular basis to avoid tripping your breaker. Disconnect the saw from power source and check your blade before re-setting the circuit breaker and continuing to saw.
Lubrication (Fig. Y)
- All motor bearings are permanently lubricated at the factory and no additional lubrication is needed.
- The height adjustment screw may require periodic cleaning and lubrication. If you have difficulty raising or lowering the blade: a. Unplug the saw. b. Turn the saw on its side, so the bottom, open part of the unit is accessible. c. Clean and lubricate the height adjustment screw threads on the underside of this saw with general purpose grease. Refer to Figure Y.
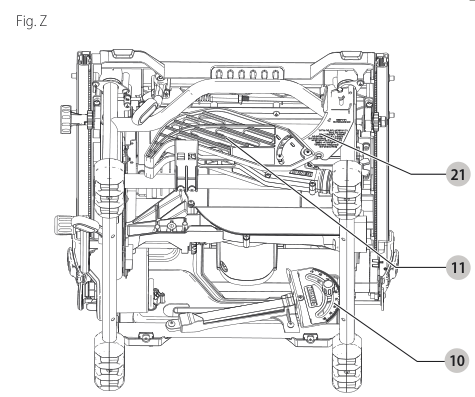
Storage (Fig. A, Z)
- Attach push stick to fence.
- Depress the stem on the anti-kickback assembly to allow the assembly to slide from the riving knife slot.
- Position anti-kickback assembly into storage as shown. While depressing stem, slide the anti-kickback assembly across the storage bracket and release pin to lock into place.
- Remove blade guard assembly. Refer to Installing/Removing the Blade Guard Assembly and Riving Knife . Place Blade guard assembly into holder as shown, then turn lock 1/4 turn to lock in place.
- Slide closed end of blade wrenches into catch then secure in place with wing nut.
- Insert guide bar of miter gauge into pocket until it bottoms out.
- Non-through-cutting riving knife can be installed on the saw (working position) or stored along with the blade guard assembly as shown.
- To store fence, snap work support in stored position. Remove fence from rails. Reattach fence upside down on left side of saw. Pivot fence lock latches to secure.
Transporting (Fig. A)
WARNING: To reduce the risk of serious personal injury, turn unit off and disconnect it from power source before transporting the saw. An accidental start-up can cause injury.
WARNING: Always transport the machine with the upper blade guard fitted.
- Before transporting, lock the fence in place, lower the blade and lock the bevel.
- Always carry the machine using the carry handles.
Accessory Construction for Alternative Operation Methods (If not equipped with narrow ripping fence)
Narrow Rip Auxiliary Fence (Fig. AA-CC)
The narrow rip auxiliary fence should be used for a rip measuring 2" (51 mm) or narrower. This fence will allow the guard to remain on the saw when performing narrow ripping. This fence will provide ample space for proper use of a push block (see, SW Push Block).
- Follow the diagram in Figure AA to construct the narrow rip auxiliary fence . NOTE: The length should be cut to the 8" length of the saw table top and side should be parallel.
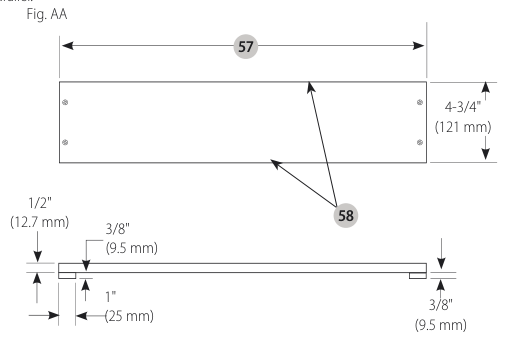
Narrow rip auxiliary fence construction diagram - After the narrow rip auxiliary fence is constructed, slip it over the saw table top and place it flush to the fence as shown in Figure CC.
Push Block (Fig. BB, CC)
IMPORTANT: Only use the push block
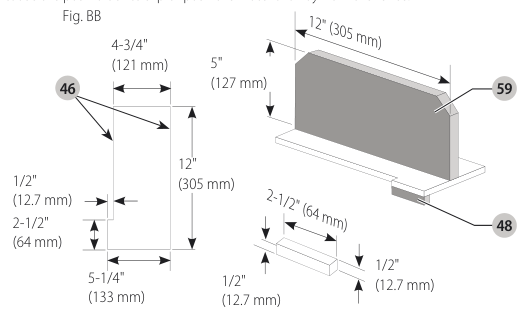
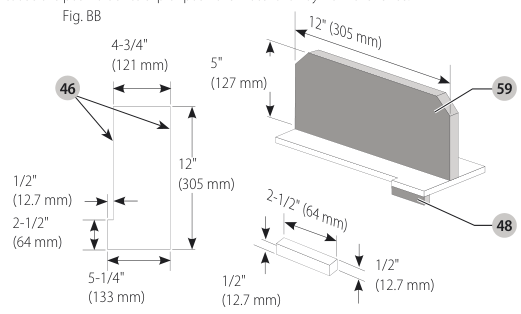
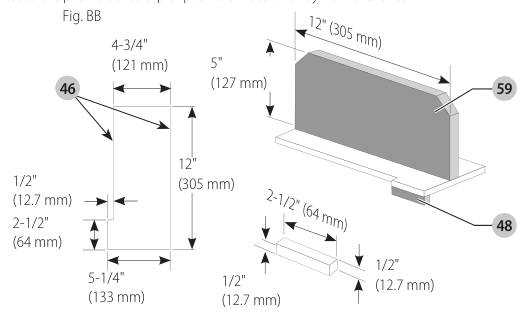
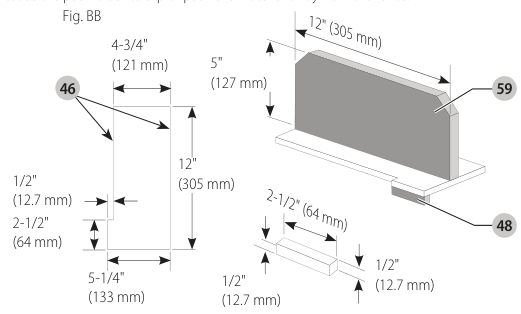
- Construct a push block using the diagram in Figure BB.
- NOTE: Edges must be parallel.
- IMPORTANT: The overhanging edge (Fig. BB) MUST be square. An uneven lip could cause the push block to slip or push the material away from the fence.
overhanging edge image
- Place the push block behind the material and ensure the lip of the block is flush to the narrow rip auxiliary fence side.
push block figure - Once the push block is in place, continue feeding the material until the cut is complete making sure the push block remains flush to the narrow rip auxiliary fence at all times.
IMPORTANT: The narrow rip auxiliary fence and the overhanging edge
Featherboard Construction (Fig. DD, EE)
Featherboards are used to keep the work in contact with the fence and table, and help prevent kickbacks. Dimensions for making a typical featherboard are shown in Figure DD. Make the featherboard from a straight piece of wood that is free of knots and cracks. Clamp the featherboard to the fence and table so that the leading edge of the featherboard will support the workpiece until the cut is complete (Fig. EE). An
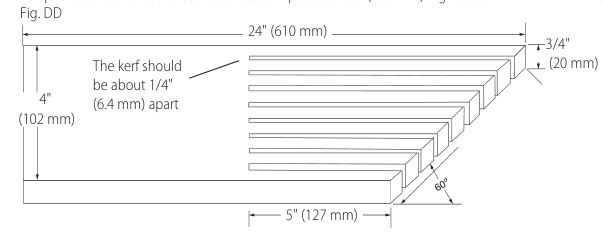
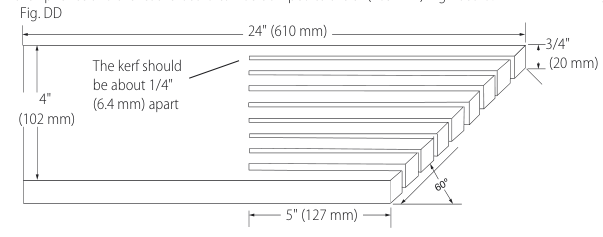
WARNING: Use featherboards for all non-through-cutting operations where the blade guard assembly, anti-kickback assembly and riving knife cannot be used. Always replace the blade guard assembly, anti-kickback assembly and riving knife when the non-through-cutting operation is complete. Make sure the featherboard presses only on the portion of the workpiece in front of the blade.
MAINTENANCE
- WARNING: To reduce the risk of serious personal injury, turn off unit and disconnect it from power source before making any adjustments or removing/installing attachments or accessories.
Cleaning
- WARNING: Blow dirt and dust out of all air vents with clean, dry air at least once a week. To minimize the risk of eye injury, always wear ANSI Z87.1 approved eye protection when performing this procedure.
- WARNING: Never use solvents or other harsh chemicals to clean the non-metallic parts of the tool.
Accessories
- WARNING: Since accessories, other than those offered by DEWALT, have not been tested with this product, use of such accessories with this tool could be hazardous.
Repairs
- WARNING: To assure product SAFETY and RELIABILITY, repairs, maintenance and adjustments should be performed by a DEWALT factory service center or a DEWALT authorized service center.
Register Online
Thank you for your purchase. Register your product now for:
- WARRANTY SERVICE: Registering your product will help you obtain more efficient warranty service in case there is a problem with your product.
- CONFIRMATION of OWNERSHIP: In case of an insurance loss.
- FOR YOUR SAFETY: Registering your product will allow us to contact you in the unlikely event a safety notification is required.
Three Year Limited Warranty
DEWALT will repair or replace, without charge, any defects due to faulty materials or workmanship for three years from the date of purchase. This warranty does not cover part failure due to normal wear or tool abuse.
90 DAY MONEY BACK GUARANTEE
If you are not completely satisfied with the performance of your DEWALT Power Tool or Nailer for any reason, you can return it within 90 days for a full refund.
LATIN AMERICA
This warranty does not apply to products sold in Latin America. For products sold in Latin America, see country specific warranty information contained in the packaging.
FREE WARNING LABEL REPLACEMENT
If your warning labels become illegible or are missing, call 1-800-4-DEWALT for a free replacement.